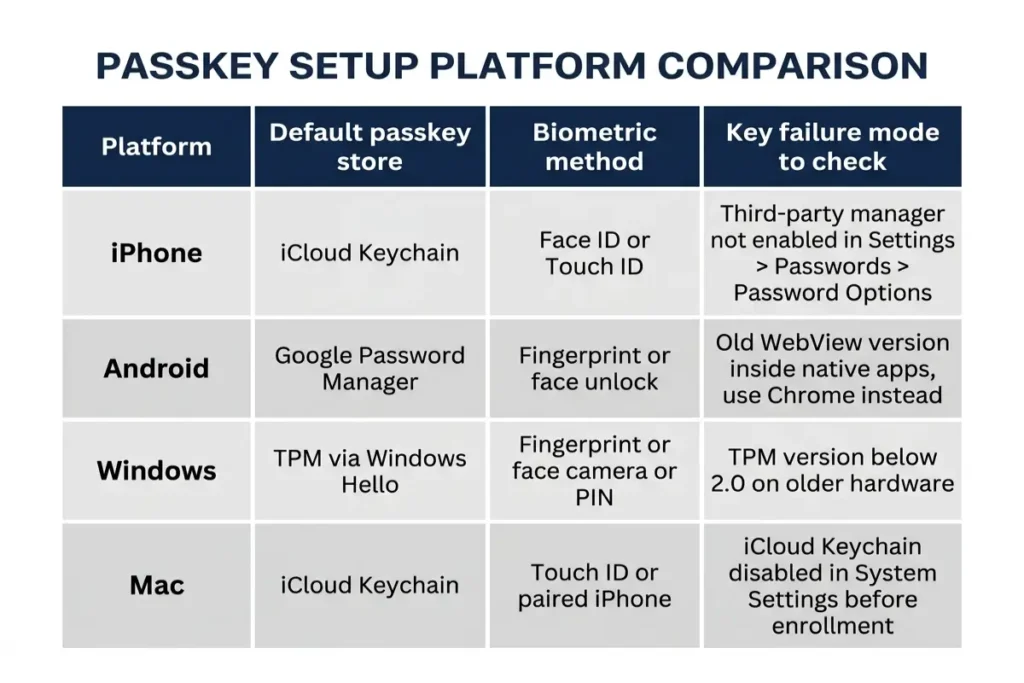
How to set up passkeys is a question with a different answer on every platform, and the difference is not just cosmetic. A passkey created through iCloud Keychain on an iPhone stays inside Apple’s ecosystem by default. A passkey created through Google Password Manager on an Android phone stays inside Google’s. A passkey enrolled on a Windows machine through Windows Hello lives in the device’s TPM unless a third-party manager intercepts it first. Knowing which platform is creating the credential and where it will live after setup is the piece most how-to guides skip, and it is the piece that determines whether a passkey setup that looks complete actually is.
The underlying cryptography behind why any of this works is in how passkeys work. Where a finished passkey should eventually live, especially for users managing credentials across mixed ecosystems, is covered in passkey vs password manager. This guide covers the hands-on step-by-step sequence for each major platform, the common failures at each stage, and the backup step every setup needs before the process is actually done.
Before starting: the two things every passkey setup needs
Before running any platform-specific steps for how to set up passkeys, two pre-conditions need confirming. The first is biometric authentication enrollment on the device itself. A passkey relies on Face ID, Touch ID, a fingerprint reader, or a Windows Hello-compatible camera or sensor to authorize use of the private key. If that biometric is not set up, the passkey enrollment dialog either fails silently or falls back to a PIN prompt that bypasses the device’s secure hardware in some configurations. Confirming biometric authentication is active takes under 30 seconds and prevents the most common silent failure in the setup sequence.
The second pre-condition is knowing which credential manager will receive the passkey before starting enrollment. On most devices, the operating system presents a choice at enrollment time: the platform default, such as iCloud Keychain on iOS or Google Password Manager on Android, or a third-party manager if one is installed and enabled in the device’s autofill settings. Choosing at that prompt rather than at setup time produces unintended splits, some passkeys in one vault, others in a second one, that complicate recovery later.
Third-party managers need one configuration step to intercept a passkey at enrollment on most platforms. On iPhone and iPad: Settings → Passwords → Password Options → enable the installed manager’s toggle, positioning it above iCloud Passwords if the manager should be the default. On Android: Settings → Passwords, Passkeys & Autofill → confirm the manager is listed and set as the preferred provider. On Windows: the third-party manager’s own browser extension handles enrollment interception in Chrome and Edge without a system-level setting change. Completing this step before opening any website’s security settings ensures the passkey lands in the right place on the first attempt rather than requiring a delete-and-reenroll correction.
How to set up passkeys on iPhone and iPad
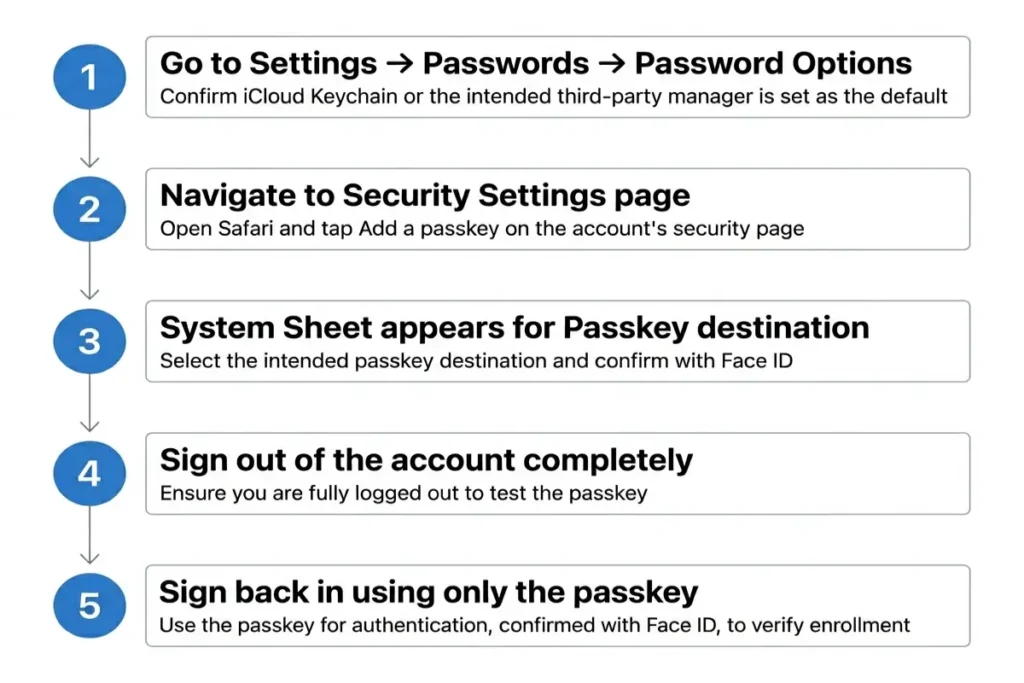
How to set up passkeys on iPhone uses iCloud Keychain as the default destination, with a third-party manager available as an alternative when the configuration step above is completed first. Open Safari and navigate to the account’s security settings page for the service where the passkey will be created. The path varies by service: Google uses myaccount.google.com, Security, Passkeys; Apple uses appleid.apple.com, Sign-In & Security, Passkeys; GitHub uses Settings, Password & Authentication, Passkeys. Most services use the same security or account settings section.
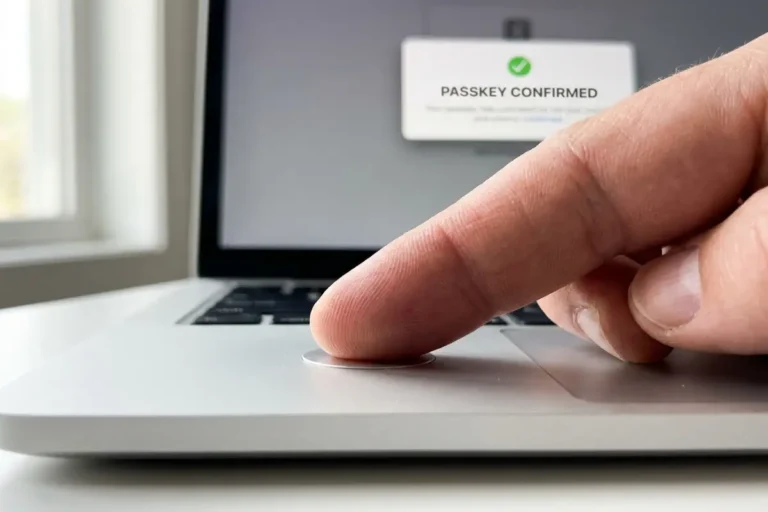
Tap the option to add a passkey. The wording differs by service: “Create a passkey”, “Add a passkey”, or “Use a passkey instead.” An iOS system sheet appears from the bottom of the screen, asking whether to save the passkey to iCloud Keychain or, if a third-party manager is enabled, offering that as an alternative. Select the intended destination. Face ID or Touch ID confirms the choice, and the passkey registration completes in under two seconds.
Return to the sign-in page immediately after enrollment and sign out of the account completely. On the same device, navigate back to the sign-in page and select “Sign in with a passkey” or allow the browser to suggest it automatically, which Safari does as an autofill suggestion above the keyboard once a passkey for that domain exists. Face ID confirms the sign-in. A successful sign-in at this stage confirms the passkey is functional before any other account settings are changed.
How to set up passkeys on iPhone across multiple browsers requires one additional awareness: Safari handles passkey autofill natively, while Chrome and Firefox on iOS use Apple’s system-level WebAuthn API rather than their own, meaning a passkey created in Safari works identically in Chrome or Firefox on the same device without any additional steps.
How to set up passkeys on Android
How to set up passkeys on Android routes through Google Password Manager by default, with behavior varying more noticeably between Android versions and device manufacturers than any other platform in this guide. Android 9 and earlier do not support passkeys at the OS level. Android 14 and later provide the smoothest experience, with the system passkey bottom sheet appearing consistently across Chrome and most major apps without requiring additional browser extension setup.
Open Chrome on the Android device and navigate to the account’s security settings page. The path is identical to the iOS steps above for services like Google, GitHub, and Microsoft, and most consumer services use the same security settings location regardless of which device opens it. Tap Add a passkey. A bottom sheet appears asking where to save the passkey, either Google Password Manager or, on Android 14 and later, a third-party credential provider if one is installed and set as the preferred autofill service.
Confirming which service handles passkey storage on Android requires checking Settings → Passwords, Passkeys & Autofill on most Android devices, or Settings → General Management → Passwords & Autofill on Samsung devices. If a third-party manager is listed but not set as the preferred provider, the system bottom sheet will still default to Google Password Manager at enrollment time even when a different manager is expected.
Fingerprint confirmation or a device PIN completes the enrollment after selecting the destination. The same sign-out-and-back-in verification step applies here as on iPhone: sign out completely after enrollment and sign back in using only the passkey to confirm the Android setup completed correctly before changing any other account settings.
One specific failure mode on Android is worth knowing before starting: apps built on older WebView versions, the component that handles web content inside native Android apps, do not support passkeys even on fully updated Android 14 devices. If a passkey enrollment attempt inside a native app fails on Android, opening the same account’s security settings page in Chrome rather than the app itself usually succeeds.
How to set up passkeys on Windows with Windows Hello
How to set up passkeys on Windows runs through Windows Hello, the platform’s biometric authentication system, which uses either a fingerprint reader or a Windows Hello-compatible camera for face recognition, depending on hardware. A PIN serves as the fallback when neither biometric option is available, and it also counts as a Windows Hello credential for passkey enrollment purposes. Confirming Windows Hello is configured before starting: Settings → Accounts → Sign-in options → Windows Hello section should show at least one active method. A device with no Windows Hello enrollment cannot complete a passkey setup without adding one first.
Chrome and Edge are the two browsers that handle passkey setup on Windows most reliably in 2026. Firefox gained WebAuthn FIDO2 support in earlier versions but its Windows Hello passkey integration still shows inconsistencies in certain enrollment flows as of mid-2026. Opening Chrome or Edge, navigating to the account’s security settings page, and tapping “add a passkey” produces a Windows security dialog rather than a browser-level sheet, requesting Windows Hello confirmation before the key pair is generated. This dialog is a system-level prompt, not a browser extension, which is why it looks and behaves identically in both Chrome and Edge.
The passkey destination on Windows depends on which credential provider is active. The Windows default routes the private key into the device’s TPM under the Windows Hello credential store, making it device-bound rather than synced to any cloud by default. A third-party manager, 1Password or Bitwarden with its browser extension installed and set as the browser’s passkey provider, intercepts the enrollment and stores the passkey in the manager’s own vault instead. Confirming which provider will handle the enrollment before navigating to the security settings page matters as much on Windows as it does on any other platform, because the system dialog does not present a choice between providers in the same way that an iOS bottom sheet does.
One Windows-specific failure mode is relevant for users on older hardware: TPM 2.0 is required for Windows Hello passkey storage. Devices running Windows 11 all have TPM 2.0 by hardware requirement, but Windows 10 machines with TPM 1.2 can encounter enrollment failures that show no helpful error message. Running tpm.msc in the Windows Run dialog confirms the TPM version before starting setup.
How to set up passkeys on Mac
How to set up passkeys on Mac routes through iCloud Keychain by default, using Touch ID on MacBook models or a paired iPhone or Apple Watch as the biometric confirmation method on Mac desktops without a fingerprint reader. Safari handles passkey enrollment natively without any extension, while Chrome and Firefox on Mac both defer to Apple’s system-level WebAuthn FIDO2 API rather than their own credential stores, meaning a passkey created in Chrome on a Mac lands in iCloud Keychain rather than a Google Password Manager entry, unlike the same action taken in Chrome on Android.
Opening Safari and navigating to the service’s security settings page starts the enrollment. After tapping “add a passkey,” macOS presents a system sheet asking for Touch ID or password confirmation. The passkey is stored immediately in iCloud Keychain and syncs to any other Apple device signed into the same Apple ID within seconds, confirmed by checking Settings on an iPhone: Passwords → the enrolled service should show a passkey icon rather than a password entry.
The macOS-specific step that catches most users off guard is the iCloud Keychain status check before starting. A Mac with iCloud Keychain disabled, either because it was never turned on or because Advanced Data Protection requires re-enrollment after being activated, will fail the passkey storage step silently on some service pages. Confirming iCloud Keychain is active: System Settings → Apple ID → iCloud → Passwords & Keychain should show as On. Turning it on triggers an iCloud sync that takes 30 to 90 seconds before a passkey enrollment attempt will complete successfully.
Third-party managers on Mac follow the same interception model as on Windows: the browser extension needs to be active and the manager needs to be configured as the browser’s credential provider. Safari’s passkey handler always routes to iCloud Keychain first on Mac; redirecting it to a third-party manager requires using that manager’s Safari extension with passkey handling enabled, a per-extension setting rather than a system-level toggle, which is why the step to check the extension settings is worth taking before starting any enrollment on Safari.
Cross-device sign-in: using a phone passkey to log in on a computer
Cross-device sign-in lets a passkey stored on a phone authenticate a login happening in a browser on a different computer, which matters practically for users who have created a passkey on their phone but are sitting at a shared or newly set-up machine that doesn’t yet have any passkeys enrolled. The experience looks unfamiliar the first time: the login page on the computer shows a QR code labeled “Use a passkey from another device” or similar wording. Scanning that code with the phone’s camera, and then confirming with Face ID or fingerprint on the phone, completes the login on the computer.
The mechanism behind this is a short-range Bluetooth exchange between the two devices, required specifically to prevent the flow from being triggered remotely. The computer and the phone confirm they are physically near each other before the phone is willing to sign the challenge, which is the safeguard that distinguishes this legitimate cross-device flow from the attack concept security researchers tested against it. The private key never moves to the computer; the phone signs the challenge and returns the signature, keeping the key exactly where it was generated.
Using cross-device sign-in is not a replacement for enrolling a passkey on the second device directly. It handles the immediate authentication situation but requires the phone to be present every time. Enrolling a passkey directly on the computer through the service’s security settings, using whichever credential provider is active on that machine, is the setup worth completing after a cross-device sign-in confirms the passkey works, so subsequent logins on that computer don’t need the phone at all.
The backup step every passkey setup skips
The backup step every passkey setup skips is registering a second device the same session the first passkey is enrolled, and it is the step that converts a theoretically complete setup into one that actually holds up when something goes wrong. A passkey on one device alone recreates exactly the single-point-of-failure problem a password manager with no backup method has: one device failure, one lost phone, one failed Face ID after an injury, and the account falls back to whatever recovery method the service still has active. If that fallback is an SMS code, the specific vulnerability covered in passkeys vs passwords applies in full.
The second device does not need to be a different platform. A MacBook registered alongside an iPhone, both using iCloud Keychain, gives two working access points to the same synced passkey without any additional enrollment on the service itself, because iCloud Keychain’s sync delivers the credential to every device signed into the same Apple ID automatically. Confirming the passkey appears on the second device requires opening that device’s credential list, iCloud Keychain on a Mac at System Settings → Passwords, and checking that the enrolled service appears with a passkey entry rather than a password entry.
For users on a third-party manager, 1Password or Bitwarden for example, synced passkey delivery to a second device is equally automatic once the manager’s app is installed and signed into on that device. The test is the same: open the manager on the second device, find the enrolled account, confirm the passkey entry is present, and then do a test sign-in from that second device before considering the setup complete.
The specific scenario where this preparation matters most, losing the primary device before any backup is registered, is covered in full in what happens if you lose the device holding your passkeys. How to set up passkeys correctly ends at a confirmed, working second device, not at the first Face ID prompt.
Cross-platform limitations worth knowing before setup
Cross-platform limitations in how to set up passkeys are not failures in the WebAuthn FIDO2 standard itself; they are gaps between the operating systems and browsers layered on top of it, and knowing them before starting setup avoids the experience of a passkey appearing to work on one device and silently failing on another.
Safari on Windows does not support passkeys as of mid-2026. A user who sets up a passkey exclusively through Safari on a Mac and then attempts to sign in on a Windows machine in Safari will find no passkey prompt available. The fix is either using Chrome or Edge on the Windows machine, or enrolling a separate Windows Hello passkey for that account from a Windows browser session. Neither option is difficult; both require knowing the limitation before running into it.
Firefox’s passkey support on Windows improved through 2025 but still shows inconsistent behavior in enrollment flows on some services, as noted in Part 2. Firefox on macOS is more reliable but also defers to Apple’s system API rather than its own, meaning a passkey created in Firefox on a Mac behaves identically to one created in Safari on the same machine, which is useful to know rather than surprising.
Android’s WebView limitation, where native apps built on older WebView versions fail to surface a passkey enrollment option even on fully updated Android 14 devices, tends to appear specifically on apps that have not updated their embedded browser component since 2023. This limitation shows no error; the passkey prompt simply does not appear. Opening the same service in Chrome on the same Android device almost always succeeds, making Chrome the reliable fallback whenever an Android app’s enrollment attempt produces nothing.

Your passkey setup verification checklist
Your passkey setup verification checklist starts with a sign-in test, not a settings audit, because a passkey that appears in a credential list but fails at the actual login screen is worse than a missing passkey entry, because it provides false confidence. Sign out of the enrolled account completely on the device where setup was done, navigate to its sign-in page, and confirm a passkey prompt appears rather than a password field. Complete the sign-in using only biometric authentication. A successful result at this step is the only confirmation that matters.
Three additional checks close the verification: confirm the passkey appears in the credential manager on a second device, confirm a test sign-in from that second device also succeeds, and then check the account’s security settings page to confirm which backup recovery methods are still active alongside the passkey. Any SMS-based recovery remaining after a confirmed two-device passkey setup is the specific fallback Proofpoint’s downgrade research identified as the remaining exploitable path.
How to set up passkeys correctly, on any platform, ends at all three checks passing rather than at the first enrollment confirmation screen. The enrollment confirmation screen means the key pair was generated and the public key stored. The three verification checks above mean the private key is accessible where it needs to be, from more than one device, with a recovery path that doesn’t recreate the vulnerability the passkey was meant to close.