

Knowing how to detect spyware before it has had months to silently strip your passwords, financial data, and private communications is one of the most valuable technical skills a computer user can possess in 2026. Spyware does not play by the rules of more visible malware — it is engineered specifically to avoid detection, to stay lightweight, to masquerade as legitimate processes, and to operate so quietly that most victims only discover an infection through its consequences — a drained bank account, unauthorized account access, or an exposure incident — rather than through any direct observation of the malware itself. This guide cuts through that concealment with systematic, layered detection techniques that apply to any Windows computer, regardless of your technical background.
Why spyware is so difficult to detect without the right approach
Traditional antivirus tools are built around a signature-based model: they maintain a database of known malware fingerprints and flag anything that matches. This approach works well against established, widely circulated threats, but spyware operators adapt rapidly. They modify their payloads regularly to generate new signatures that evade existing databases, they use code obfuscation to disguise their programs’ true function, and they borrow techniques from legitimate software — the same code structures used by corporate monitoring tools, parental control applications, and enterprise endpoint management solutions — to blend into the landscape of expected system activity.
The detection challenge with fileless spyware
The most sophisticated contemporary spyware does not write a file to disk at all. Fileless spyware operates entirely in RAM, injecting its code into legitimate Windows processes through techniques like process hollowing or reflective DLL injection. Because it leaves no file on the filesystem, signature-based scans have nothing to find. Detection requires behavioral monitoring at the process and memory level, which is a capability that varies dramatically across security products. Understanding this distinction helps explain why no single detection approach is sufficient and why a layered methodology produces far more reliable results.
The seven-layer detection methodology
Effective spyware detection follows a logical sequence from the most accessible and general indicators down to increasingly technical forensic analysis. Working through this methodology in order focuses your effort efficiently and builds a progressively clearer picture of whether your system is compromised.
Layer 1 — Monitor your system’s performance baseline
Every computer has a characteristic performance baseline: a normal range for CPU usage, memory consumption, disk activity, and network traffic during various activities. Deviations from that baseline are the first and most accessible signal of a potential problem. Windows Task Manager, accessible by pressing Ctrl+Shift+Esc, provides real-time visibility into CPU, memory, disk, and network usage broken down by process.
Establish your baseline during normal usage — when you are actively using your computer for typical tasks — and note the processes that consistently appear and their typical resource consumption. Then observe the system during idle periods. A system that remains at 20–30% CPU utilization with no user-initiated tasks running has processes doing work in the background that deserve scrutiny. High disk activity during idle periods suggests a process is reading or writing files continuously, which may indicate data collection and preparation for exfiltration. Sustained network activity when you are not actively browsing or streaming is among the clearest behavioral signals of spyware in operation.
Layer 2 — Audit your running processes in depth
The process list in Task Manager is a starting point, but it lacks important context. Process Explorer, a free tool from Microsoft’s Sysinternals suite, provides significantly richer information: the full file path of each process’s executable, its digital signature status, its parent process, the network connections it has open, and the DLLs it has loaded. This additional context transforms a list of process names into a meaningful map of your system’s activity.
Work through your running process list with Process Explorer and identify anything that cannot be positively attributed to software you knowingly installed or to a documented Windows system component. Pay particular attention to processes without verified digital signatures — legitimate Windows components and major software vendors consistently sign their executables, and the absence of a signature in a process claiming to be a system component is a significant red flag. Also note any processes that have spawned unexpected child processes, as this pattern is characteristic of process injection techniques used by spyware to conceal its activity within trusted processes.
Layer 3 — Analyze your network connections
Spyware must communicate externally to fulfill its purpose. Every transmission of your data to a remote server creates a network connection that, if captured and analyzed at the right moment, reveals the communication. The netstat command, run from an elevated command prompt with the parameters -b -n -o 30, shows all active network connections, their remote IP addresses, the protocol in use, and the process ID responsible for each connection. Running this output repeatedly while performing no active internet activity identifies any process maintaining persistent external connections during idle periods.
Take the remote IP addresses from any connection you cannot identify and research them through threat intelligence lookup tools such as VirusTotal or AbuseIPDB. IP addresses associated with known command-and-control infrastructure, hosted in unexpected geographic locations, or flagged by multiple threat intelligence sources are strong indicators that the process maintaining those connections is malicious. This network-level analysis catches spyware that has successfully evaded file-based detection by operating from memory, since memory-resident code still generates network traffic that must traverse the same physical network stack as any other connection.
For a comprehensive removal approach after confirming an infection, the complete step-by-step spyware removal process for all devices → Spyware removal guide provides the full methodology from isolation to credential reset.
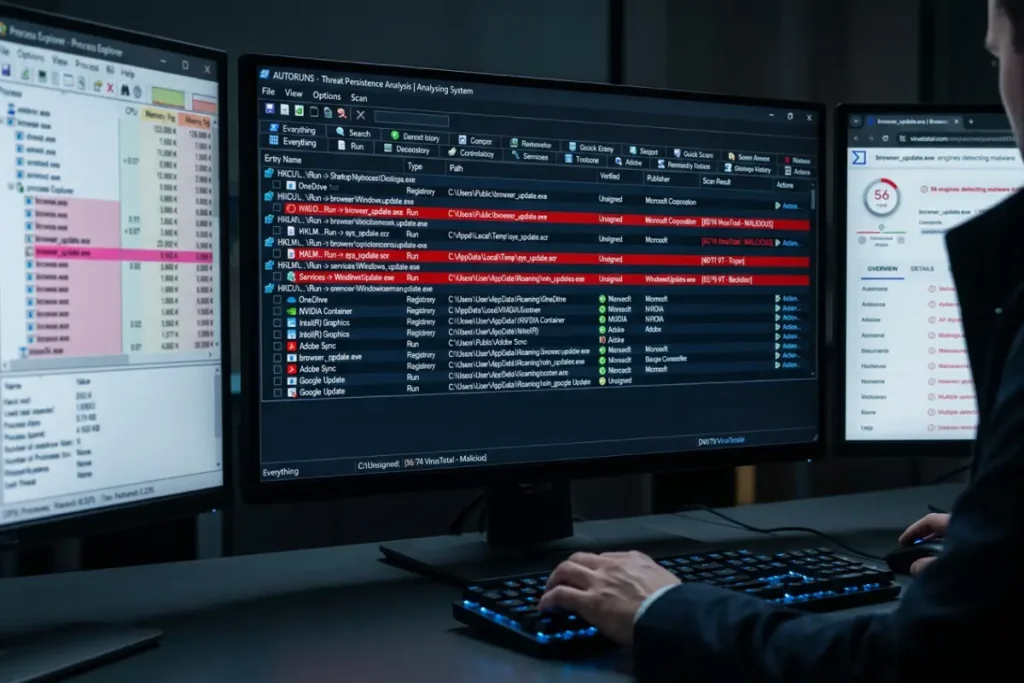
Layer 4 — Examine startup locations and persistence points
Spyware cannot fulfill its surveillance function unless it runs continuously. To ensure continuous operation, it registers itself at system startup using one or more of the many persistence mechanisms Windows makes available. Autoruns, another free tool from the Sysinternals suite, is the most comprehensive startup analysis tool available — it scans over thirty different Windows startup locations simultaneously and presents every entry with its file path, digital signature status, and an option to submit each entry to VirusTotal for reputation analysis directly from the interface.
Run Autoruns with elevated administrator privileges and work through the results, focusing on the Logon, Scheduled Tasks, Services, and Browser Helper Objects tabs. Apply the same signing standard as with running processes: any entry without a verified signature from a recognized publisher deserves close scrutiny. Autoruns’ VirusTotal integration allows you to check the reputation of any suspicious entry immediately, providing a rapid verdict on whether a flagged startup item has been previously identified as malicious.
Layer 5 — Check your browser for signs of hijacking
The browser is both the primary attack surface for many spyware infections and one of the most revealing diagnostic targets once an infection is suspected. Browser hijackers modify settings that most users never examine: the default search engine configuration, the new tab page URL, the homepage setting, the proxy configuration, and the list of installed extensions. A comprehensive browser audit covers all of these.
In Chrome, navigate to Settings and verify your search engine, startup pages, and default browser configuration match your expectations. Click on Extensions and examine every installed extension — for each one, click Details and review its permissions. An extension with access to “Read and change all your data on the websites you visit” has the capability to function as a keylogger and form-grabber within the browser, and any extension with this permission level that you cannot positively identify as a tool you intentionally installed and trust should be removed immediately.
Firefox users should access the Add-ons Manager and perform the same audit of installed extensions, themes, and plugins. Also examine the browser’s advanced configuration by navigating to about:config and searching for “proxy” settings — spyware sometimes modifies Firefox’s proxy configuration to route traffic through an attacker-controlled server for interception, a modification that does not appear in the normal settings UI.
Also examine your Windows proxy settings directly through Settings, then Network & Internet, then Proxy. An “automatic proxy configuration script” or a manually configured proxy address that you did not set represents a serious finding, as it indicates your network traffic is being routed through an external system for interception.
Layer 6 — Use dedicated spyware detection scans
After completing the behavioral and manual analysis layers, run dedicated anti-spyware scans to confirm findings and identify any threats the behavioral analysis may have missed. The advantage of running scans after manual analysis rather than before is that you now have context: if a scanner flags a process or file you already identified as suspicious through behavioral analysis, that corroboration significantly increases confidence in the finding. Conversely, if a scanner flags something you had considered benign, you have the behavioral data to evaluate whether the flag is legitimate or a false positive.
Use at least two independent scanning tools from different vendors, since different detection engines have different signature databases and behavioral heuristic models. No single scanner achieves 100% detection rates across all spyware families, and combining tools from vendors whose detection technologies differ — one signature-based and one behavior-based, for example — provides complementary coverage that catches more of the threat landscape than any single tool alone.
Layer 7 — Verify your DNS and Hosts file configuration
The final layer of detection addresses infrastructure-level manipulation. Spyware sometimes modifies the Windows Hosts file (located at C:\Windows\System32\drivers\etc\hosts) to redirect specific domains — typically antivirus vendor update servers — to localhost or to an attacker-controlled address, preventing security updates from reaching your system. Open the Hosts file in Notepad with administrator privileges and verify that it contains only the standard localhost entries and any entries you intentionally added. Any additional lines representing redirects for security vendor domains should be treated as a critical finding.
Similarly, verify your DNS server configuration in your network adapter settings. Spyware sometimes changes DNS server addresses to redirect your queries through a malicious resolver that can serve manipulated responses — pointing you to fraudulent versions of legitimate websites for credential harvesting. Your DNS servers should match the addresses provided by your ISP, your router, or a trusted public DNS service you intentionally configured. Unknown DNS server addresses warrant immediate investigation.
What to do when you confirm a detection
The moment you identify evidence that convincingly indicates spyware is present, your next step is containment, not immediate removal. Disconnect from the network, as described in the primary removal methodology, to prevent further data exfiltration. Document what you found — screenshots of the suspicious process, its file path, the network connections it was maintaining — because this documentation is valuable both for the removal process and, if you choose to pursue legal action, as forensic evidence.
Do not restart the system before completing your documentation, as some spyware cleanup tools flush volatile memory data that might contain additional evidence. Then proceed through the removal steps in sequence, using the techniques appropriate to the type of spyware identified. If you identified rootkit characteristics — processes that appear and disappear, file paths that show in network logs but not in filesystem scans — move directly to an offline bootable scanner rather than attempting online remediation, which a rootkit can actively resist.
Tools that make detection faster and more reliable
The detection methodology above produces reliable results but requires time and a degree of technical comfort. Several tools streamline the process significantly without sacrificing thoroughness. Beyond Autoruns and Process Explorer from Sysinternals, Wireshark provides the deepest available visibility into network traffic, capturing raw packets and enabling the analysis of precisely what data is being transmitted and to where. Malwarebytes’ free scanner provides rapid on-demand detection for a wide range of spyware families. HijackThis, despite its age, remains one of the most comprehensive browser hijacking detection tools available and produces a detailed log that covers all major browser modification vectors.
For those who want to verify whether specific files are malicious without committing to a full system scan first, VirusTotal accepts file uploads and URL submissions and runs the submitted content against over seventy antivirus engines simultaneously, returning detection results from all of them. A file flagged by thirty or more engines is almost certainly malicious; a file flagged by one or two might be a false positive or a very new threat with limited detection coverage.
When detection points to stalkerware
If your detection process reveals monitoring software that appears designed to track location, record communications, or monitor social media activity — particularly if it was installed without your knowledge — the situation requires a response that goes beyond technical remediation. The specifics of stalkerware detection and the appropriate response strategy, including personal safety considerations that may take precedence over immediate removal, benefit from the guidance available through organizations like the Coalition Against Stalkerware at stopstalkerware.org. Additionally, reviewing the proven tools specifically designed to remove stalkerware and surveillance spyware → Best free spyware removal tools that actually work can help you identify the right solution for your specific situation.

Common mistakes that cause detection failures
Even with the right methodology and tools, certain systematic errors consistently cause detection attempts to fail. Understanding these failure modes is as important as understanding the detection techniques themselves.
Trusting a single scanner’s clean verdict
The most common and consequential mistake is interpreting a single scanner’s “no threats found” result as confirmation that a system is clean. No scanner achieves 100% detection rates. Zero-day spyware — newly created variants with no existing signatures — will evade every signature-based scanner until their signatures are added to the database. Behavioral detection is more robust against zero-days, but even behavioral engines have false negative rates. A clean result from a single scanner should increase your confidence that specific, known threats are absent. It is not proof that no threat exists.
Scanning in an active OS rather than offline
As discussed in the methodology section, rootkit-equipped spyware can manipulate what the operating system reports, causing online scans to miss it entirely. If your behavioral analysis has identified strongly suspicious patterns that online scans fail to explain, proceed to offline scanning before concluding the system is clean. Boot from a trusted external source — a recovery USB drive from your antivirus vendor or a Knoppix-based rescue disk — and scan from that environment, which the compromised OS cannot influence.
Focusing only on new files
Spyware does not always introduce new files to your system. Fileless variants operate entirely from memory. Code injection techniques plant malicious code inside the address space of legitimate processes without touching the filesystem. Process hollowing replaces the code of a legitimate running process with malicious code while maintaining the original process name and signature. Focusing your detection exclusively on filesystem artifacts misses these technique categories entirely.
Ignoring browser extension permissions
Browser extensions receive permissions that, in any other context, would be considered extraordinary access to your personal data. An extension permitted to read all data on all websites is, technically speaking, a keylogger by capability. The vast majority of browser extensions with broad permissions are legitimate tools — password managers, ad blockers, developer tools — but the same capability set is fully available to malicious extensions, and distinguishing the two based on extension name alone is insufficient. Permissions, developer identity, user review patterns, and the extension’s behavior all require evaluation.
How to document your detection findings for professional support
If your detection process reveals a complex infection that exceeds your ability to remediate independently, or if the situation may require legal action, documenting your findings in a format useful to professional incident responders or law enforcement requires specific steps. Preserve memory captures using a tool like RAMMap before performing any remediation that might flush volatile data. Create filesystem images using a forensic imaging tool so that the state of the drive at the time of detection can be reconstructed accurately. Export the findings from Autoruns, Process Explorer, and any scanner logs in their native formats, and document the timeline of your observations in writing with timestamps.
This documentation serves multiple purposes: it provides professional responders with a richer picture of the infection than the post-remediation state alone, it preserves evidence in a form that may be legally admissible, and it allows the specific spyware variant to be identified more precisely, which may reveal what data was exfiltrated and for how long.